


Many of you may have already received your Galaxy Note 9 handsets while others will be picking one up in the next few days. Before you take it out of the box and run through the Galaxy Note 9 setup procedure, here are 9 things that you should set up first on your new Samsung flagship.
Samsung Galaxy Note 9 setup
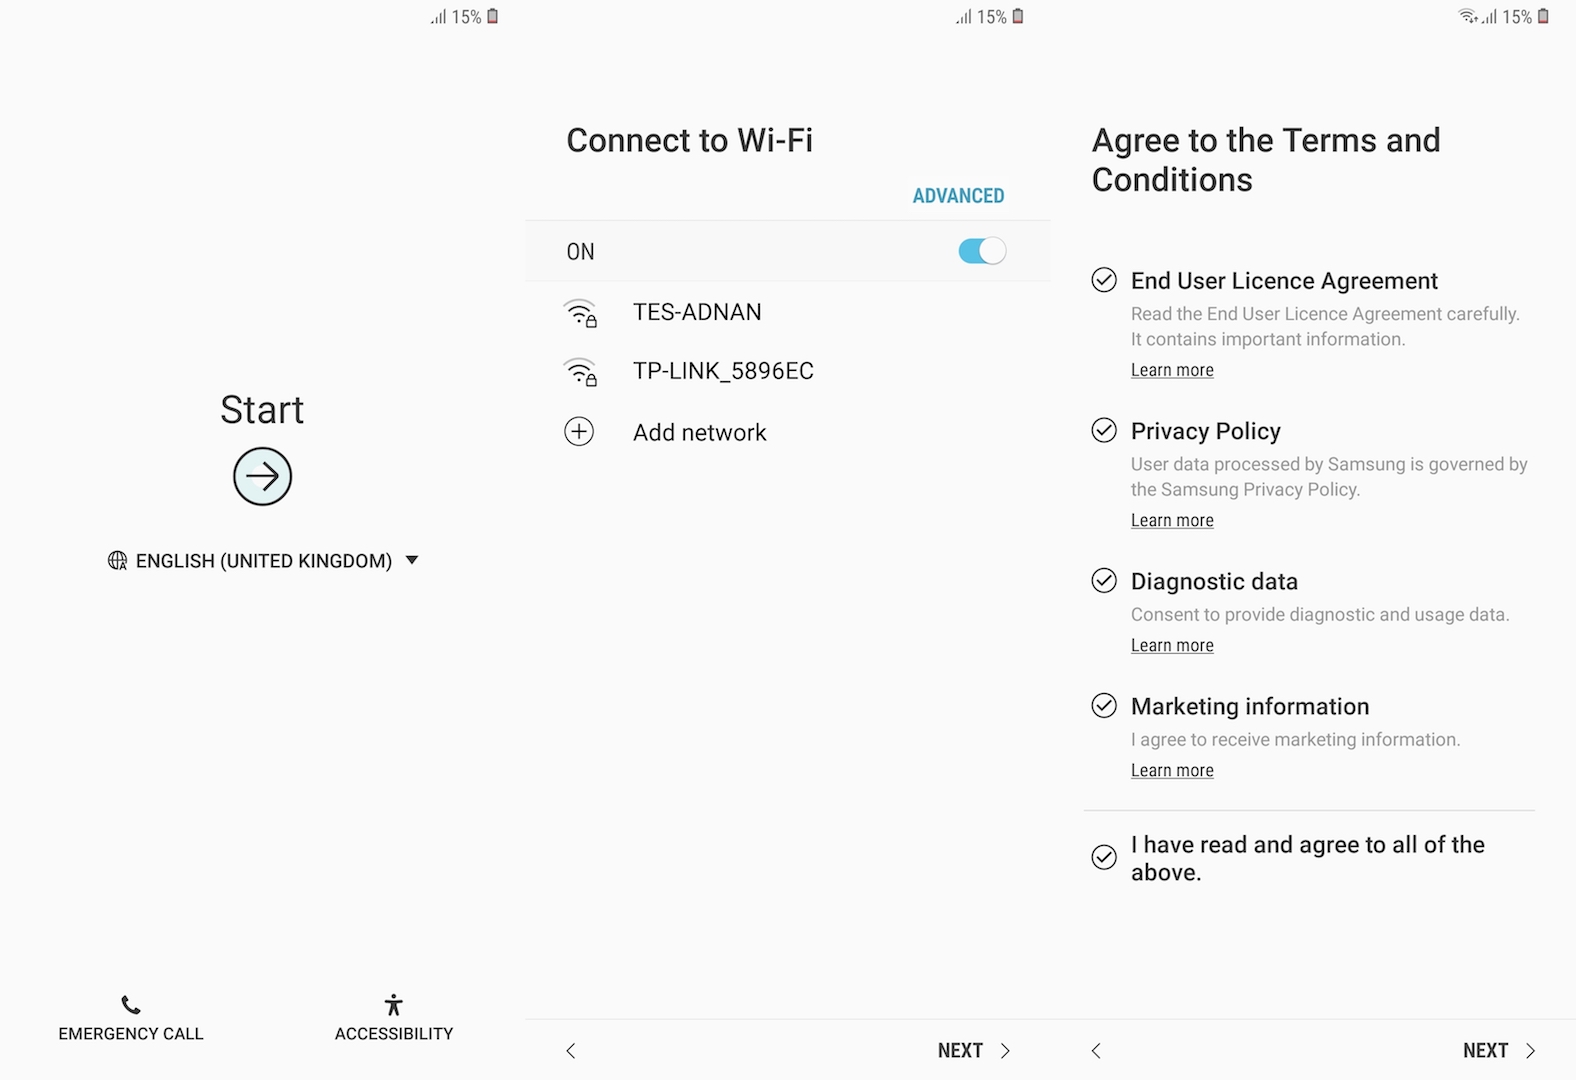
When you power up your Galaxy Note 9 for the first time you will be taken to the setup wizard which will walk you through the steps. Connecting to Wi-Fi is one of the first steps followed by either logging in with or creating a new Google Account. Accept the user agreements and policies to keep the process moving.
1. Set up Intelligent Scan
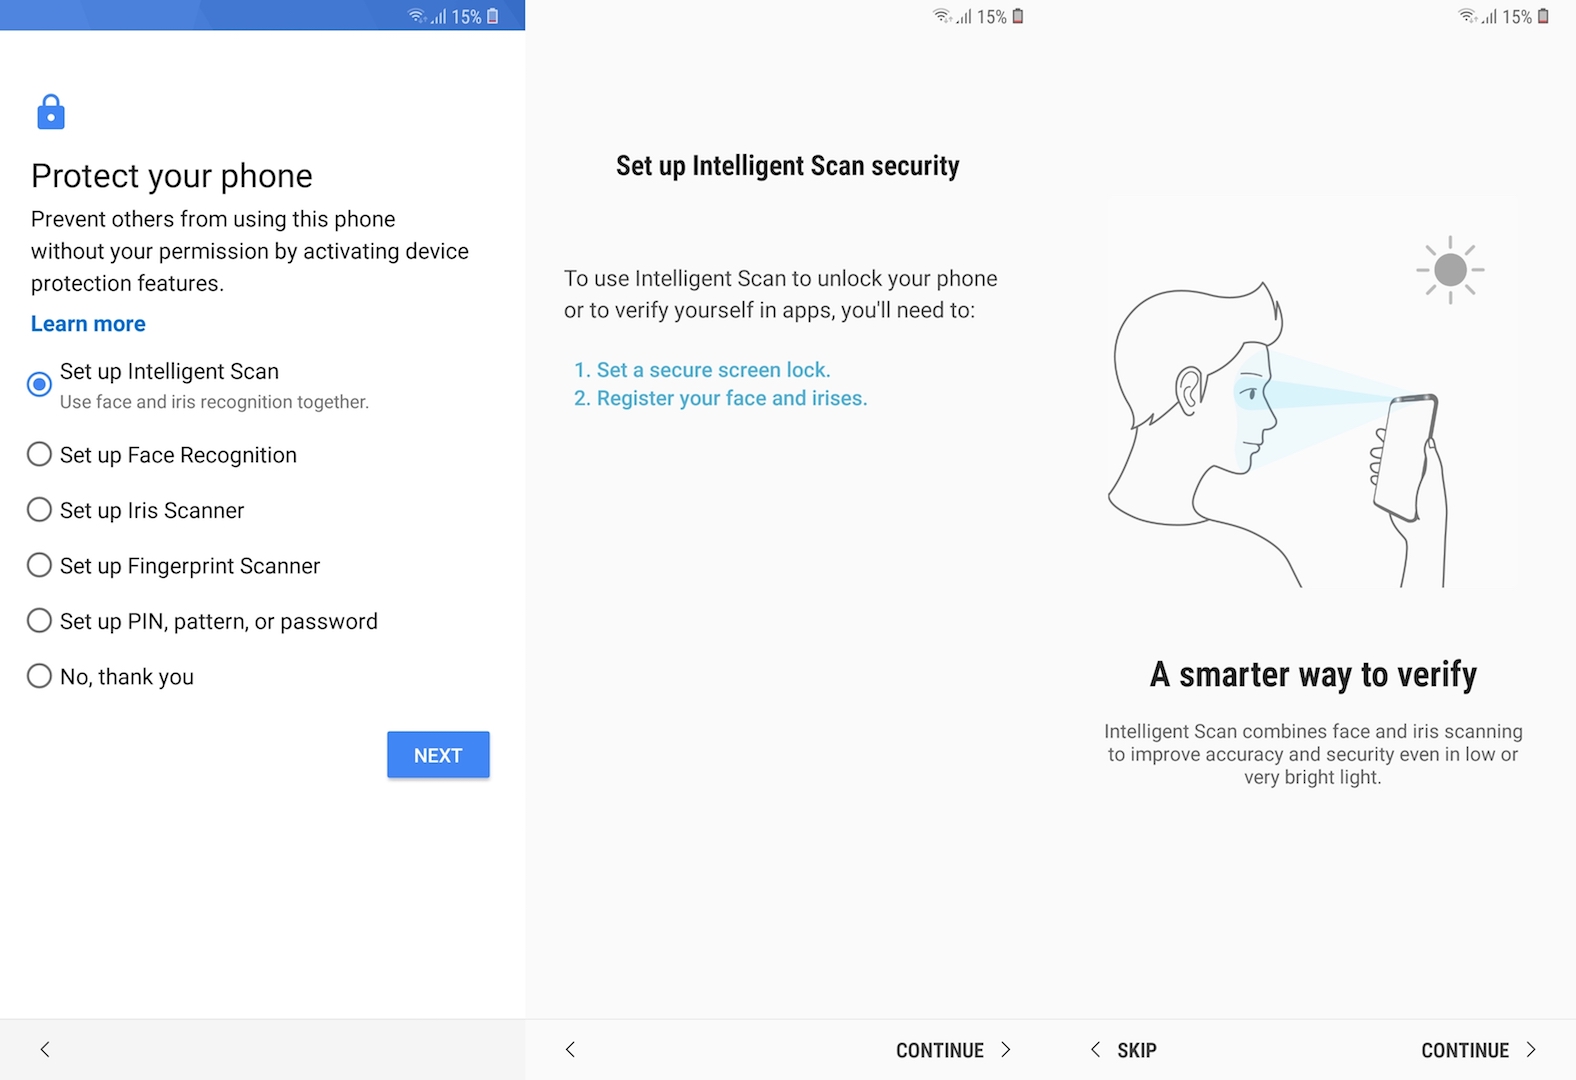
Configuring access control to the device should definitely not be skipped during the Galaxy Note 9 setup. There are five different options that can be used for this purpose. The Galaxy Note 9 supports conventional Android methods such as PIN, pattern or password in addition to fingerprint scanning, iris scanning and facial recognition.
It requires you to register your irises and face both. When you try to unlock the device it scans both and just uses what it can detect first. It thus speeds up the unlocking process. Simply follow the on-screen instructions offered by the Galaxy Note 9 setup wizard to configure Intelligent Scan.
2. Sign in or create a new Samsung account
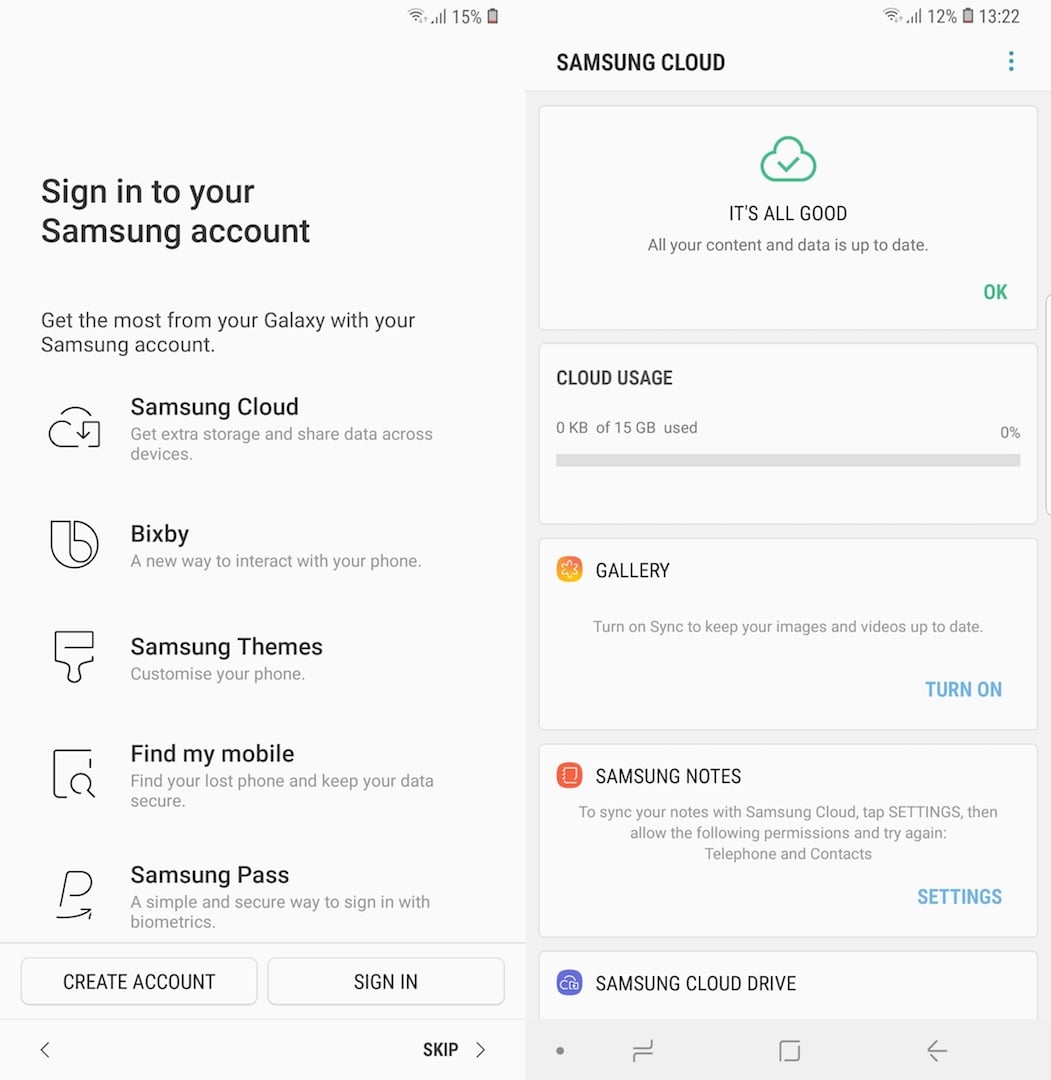
It’s entirely possible to continue using your device without setting up a Samsung account but you’d be better off with it. As the company itself says, the account is your gateway to the world of Samsung. You need it to access the wide variety of services that Samsung offers to device owners.
The Samsung account is your ticket to services like Bixby, Samsung Themes, Find my mobile, Samsung Pass, Galaxy Apps, Secure Folder and Profile Sharing. You also can’t access the 15GB of free Samsung Cloud storage unless you have an account. So this step certainly shouldn’t be skipped during the Galaxy Note 9 setup.
3. Increase display resolution to WQHD+
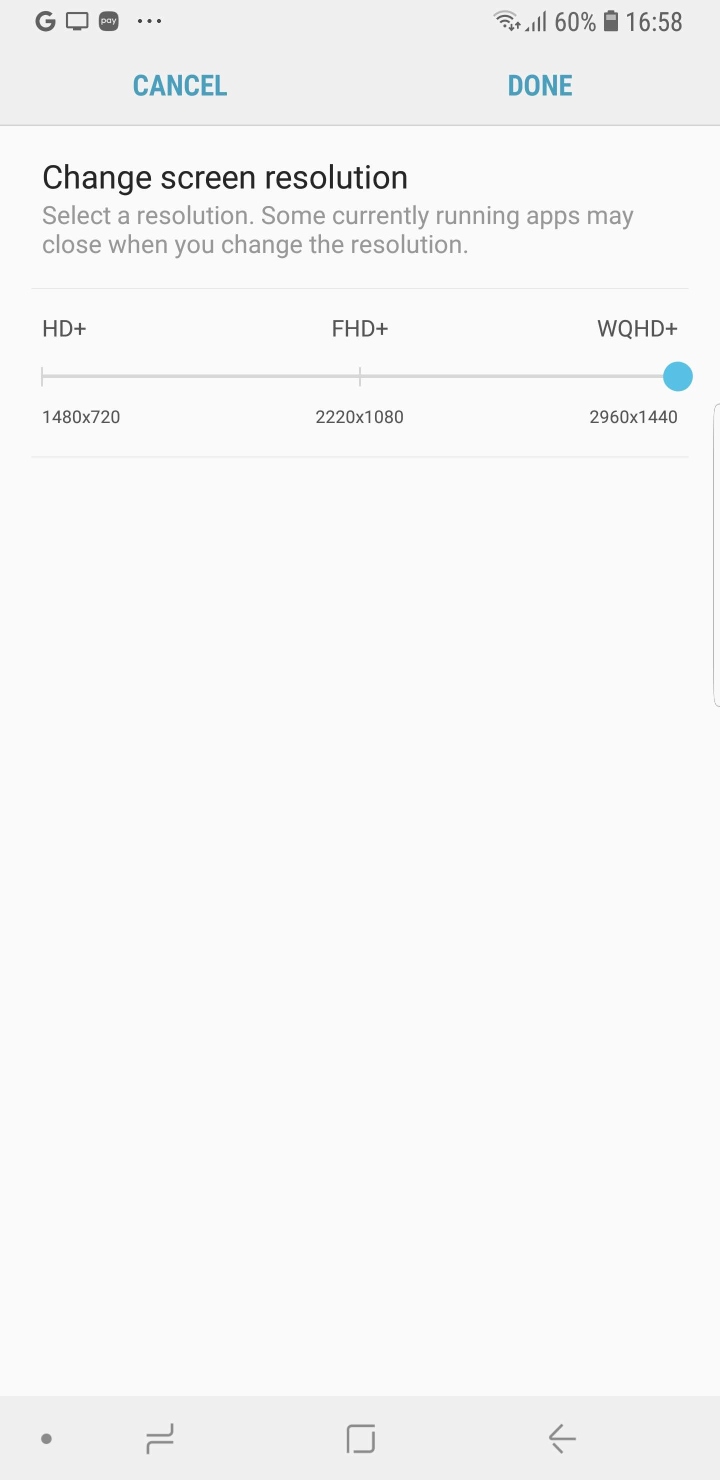
Samsung opted for a lower default screen resolution on its flagships with the Galaxy S8 and has stuck with it since then. The Galaxy S8, Galaxy Note 8 and Galaxy S9 all come with the resolution set to Full HD+ (2220×1080). If you wanted to get the most out of the display, you had to manually switch to WQHD+.
It’s the same story on the Galaxy Note 9 as well. The handset certifiably has the best smartphone display on the market right now and it doesn’t really make sense to limit it to a lower screen resolution by default. It made sense on those devices because they had smaller batteries. The Galaxy Note 9 has an impressive 4,000mAh battery so do yourself a favor and learn how to switch to WQHD+ (2960×1440) display resolution on the Galaxy Note 9.
4. Configure Always On Display
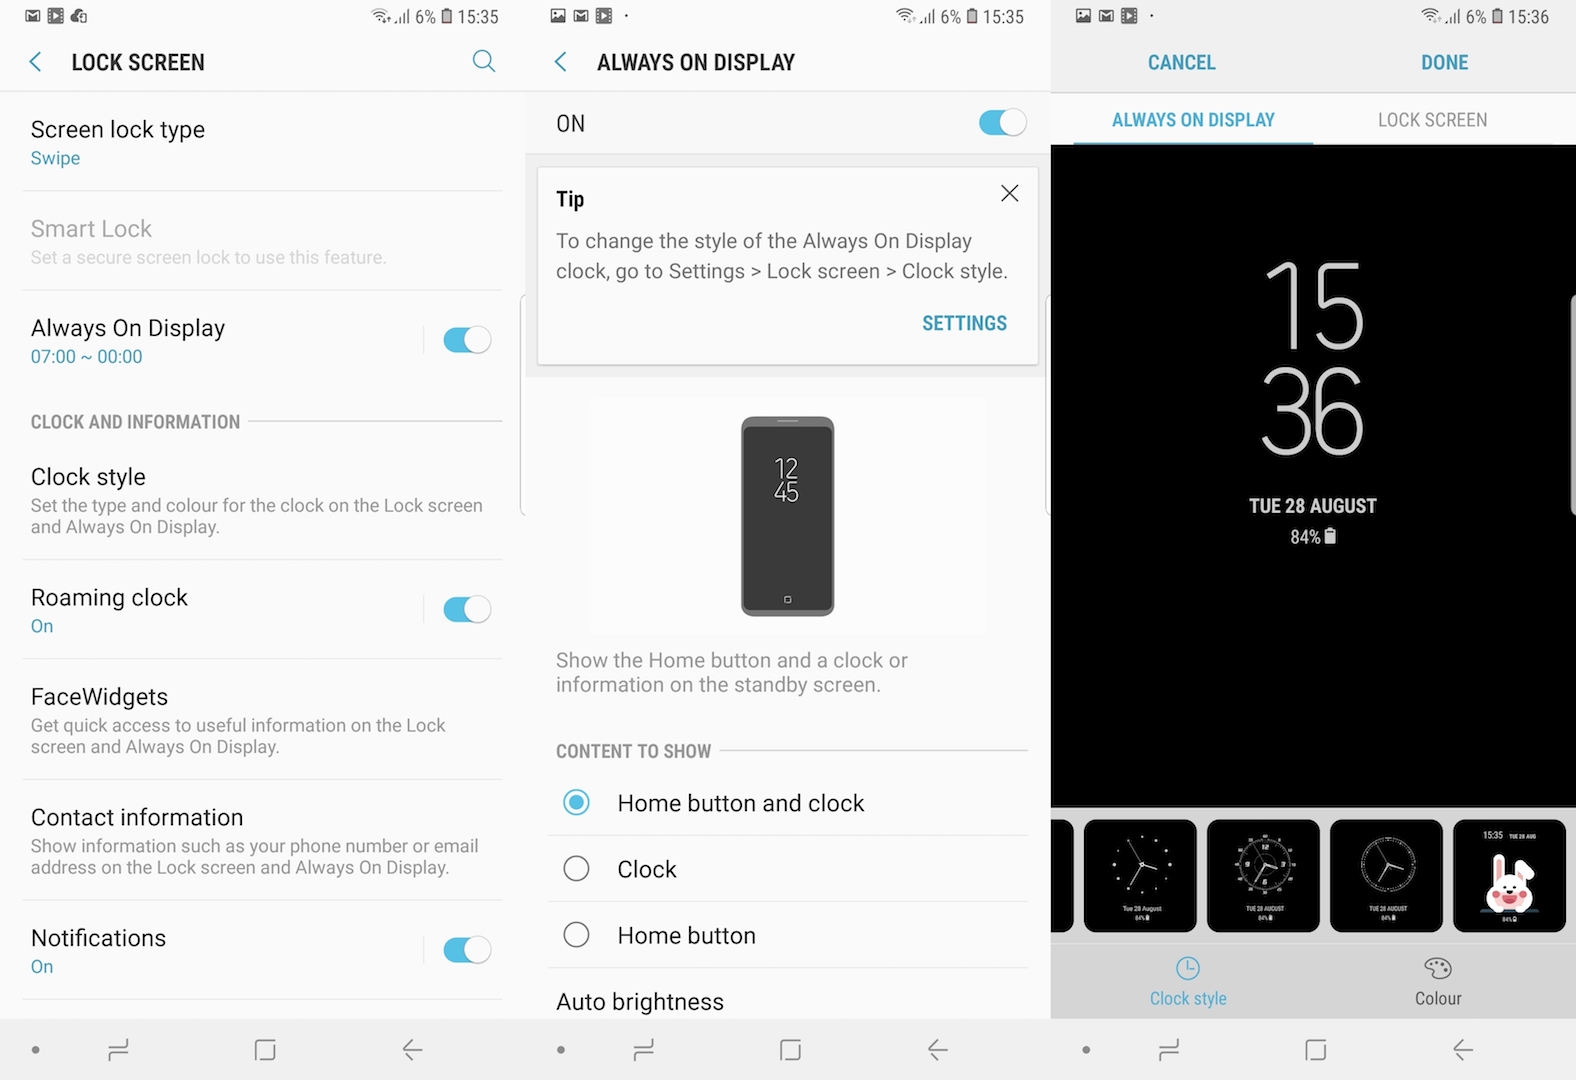
The Always On Display was introduced with the Galaxy S7 and Galaxy S7 edge. It displays time, date, battery status, app notifications and more when the display is turned off. This eliminates the need to turn on the display every time you want to check these details at a glance.
It’s highly recommended to configure the Always On Display. The relevant options can be found in the Lock Screen menu of the Settings app. There are various clock styles and colors that you can choose from. FaceWidgets provide quick access to useful information such as the day’s schedule, next alarm, weather and even a music controller. Your contact information can be configured to show on the Always On Display as well.
5. Enable Dolby Atmos
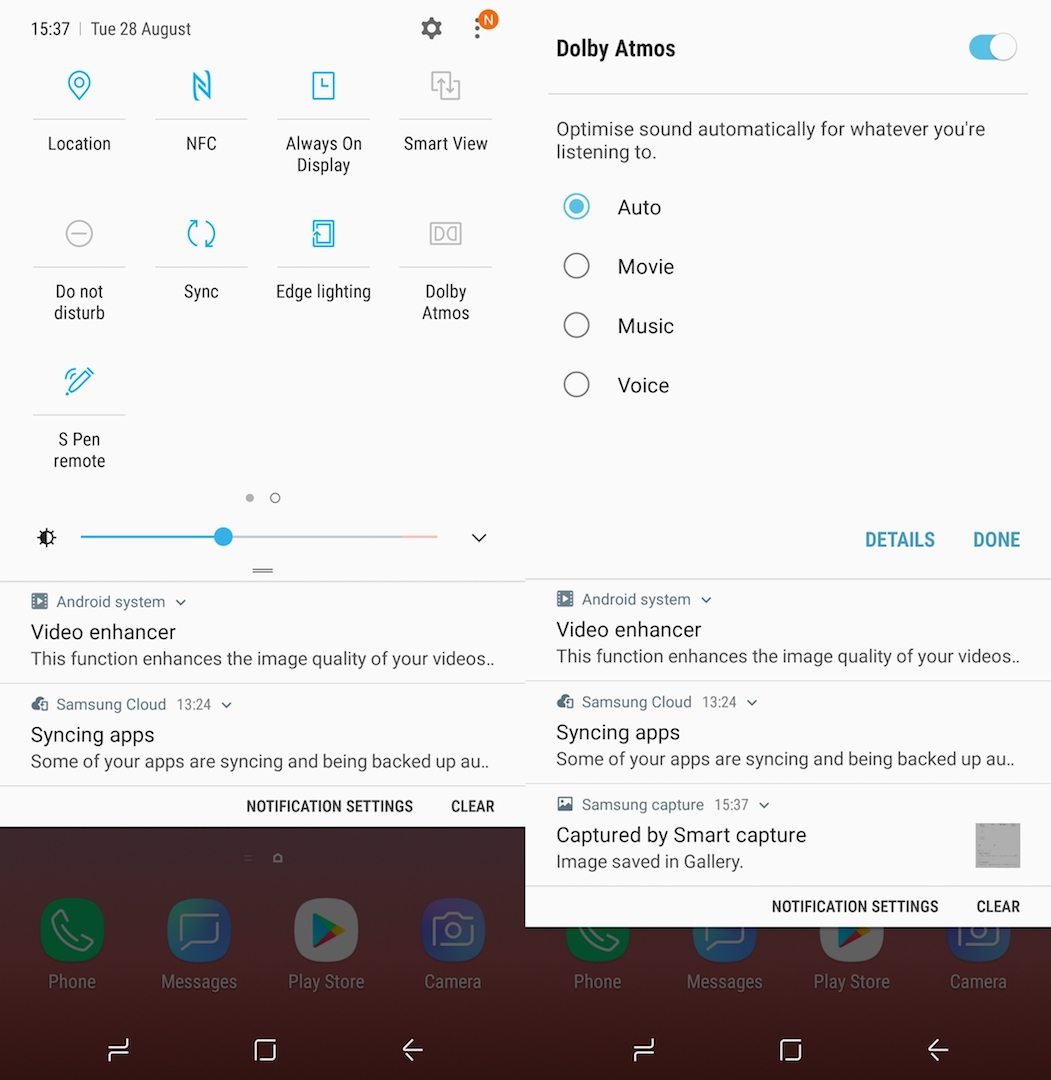
The Galaxy Note 9 comes with stereo speakers that provide a powerful audio experience. Dolby Atmos is a useful feature to have on a device that has stereo speakers so it’s no surprise that the Galaxy Note 9 has it. The feature also enhances the audio experience on the AKG-tuned earphones that ship with the new flagship.
Dolby Atmos is disabled by default on the Galaxy Note 9. It works on the Auto setting which will detect the type of media being played and adapt the audio accordingly. You can also play around with the different mode to see which one fits your use case best. We already have a tutorial up on how to enable Dolby Atmos on the Galaxy Note 9.
6. Configure S Pen Remote
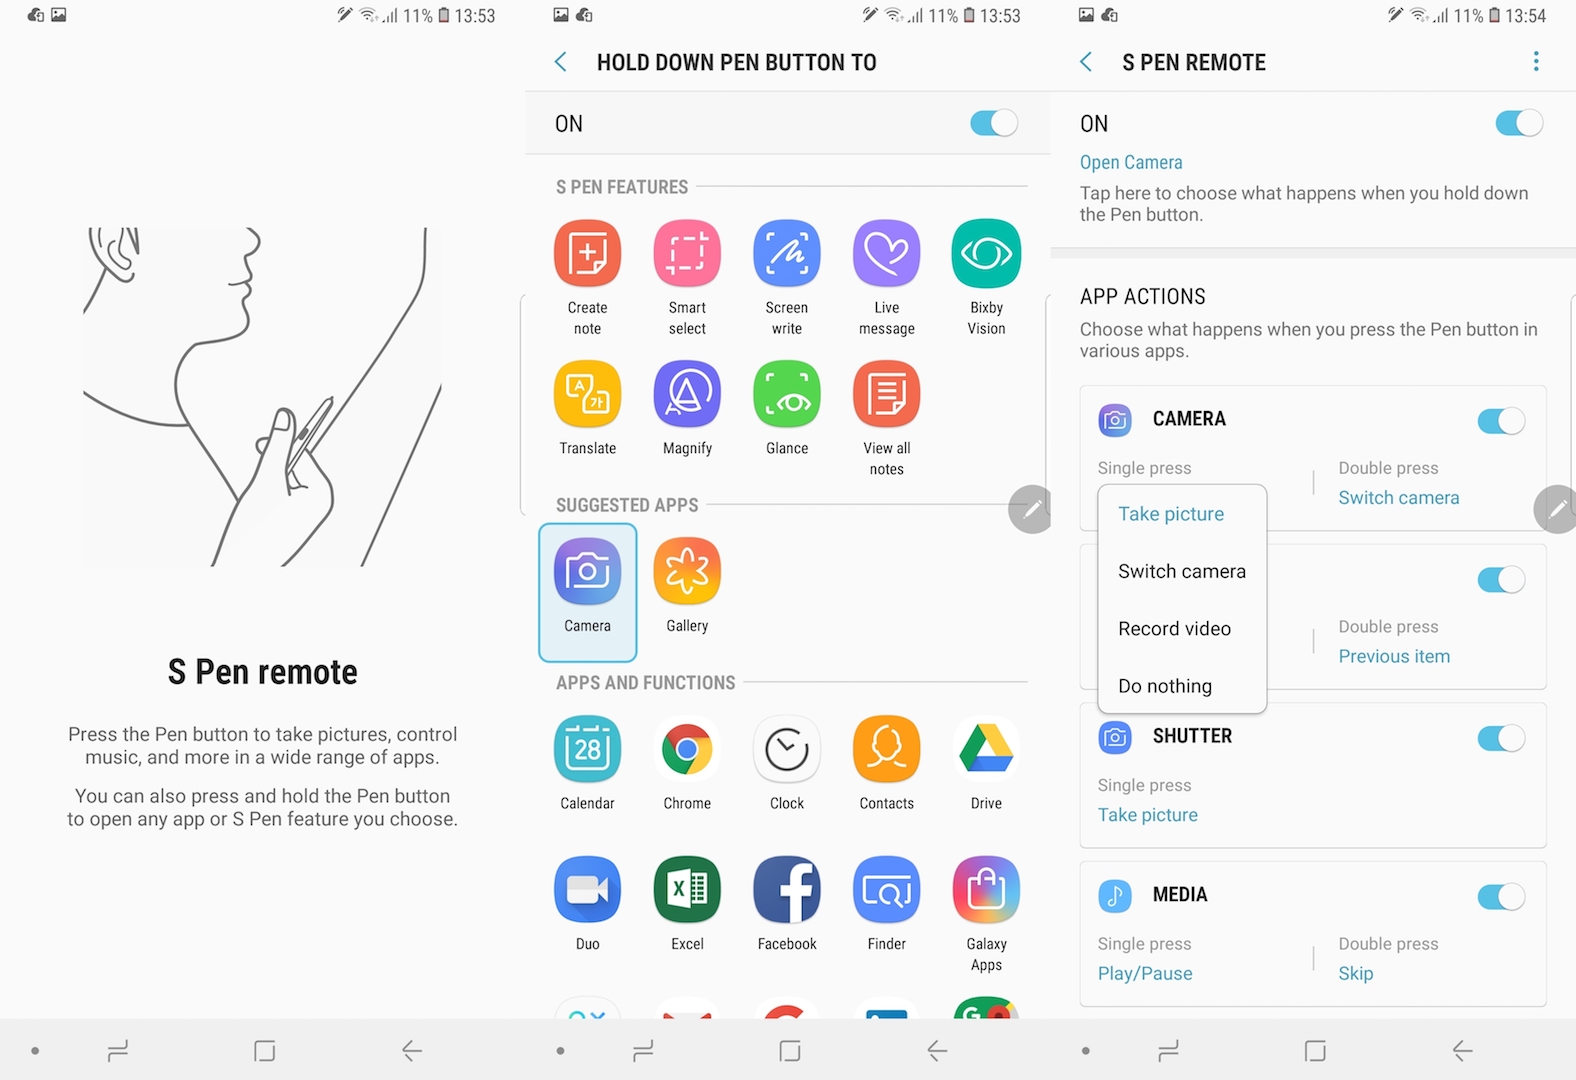
The S Pen has received a major update for the Galaxy Note 9. It’s the first stylus in this series with Bluetooth support. This means that the S Pen can offer features never seen before on a Galaxy Note series device. It can double as a remote control for the camera and media player or even as a controller for presentations.
You’re informed of this new capability when you pull out the S Pen for the first time after the Galaxy Note 9 setup. If you tap on More, you will be taken to the S Pen Remote menu where you can configure what app opens when the S Pen button is held down and what a single or double press of the button does in various apps.
7. Setup Bixby
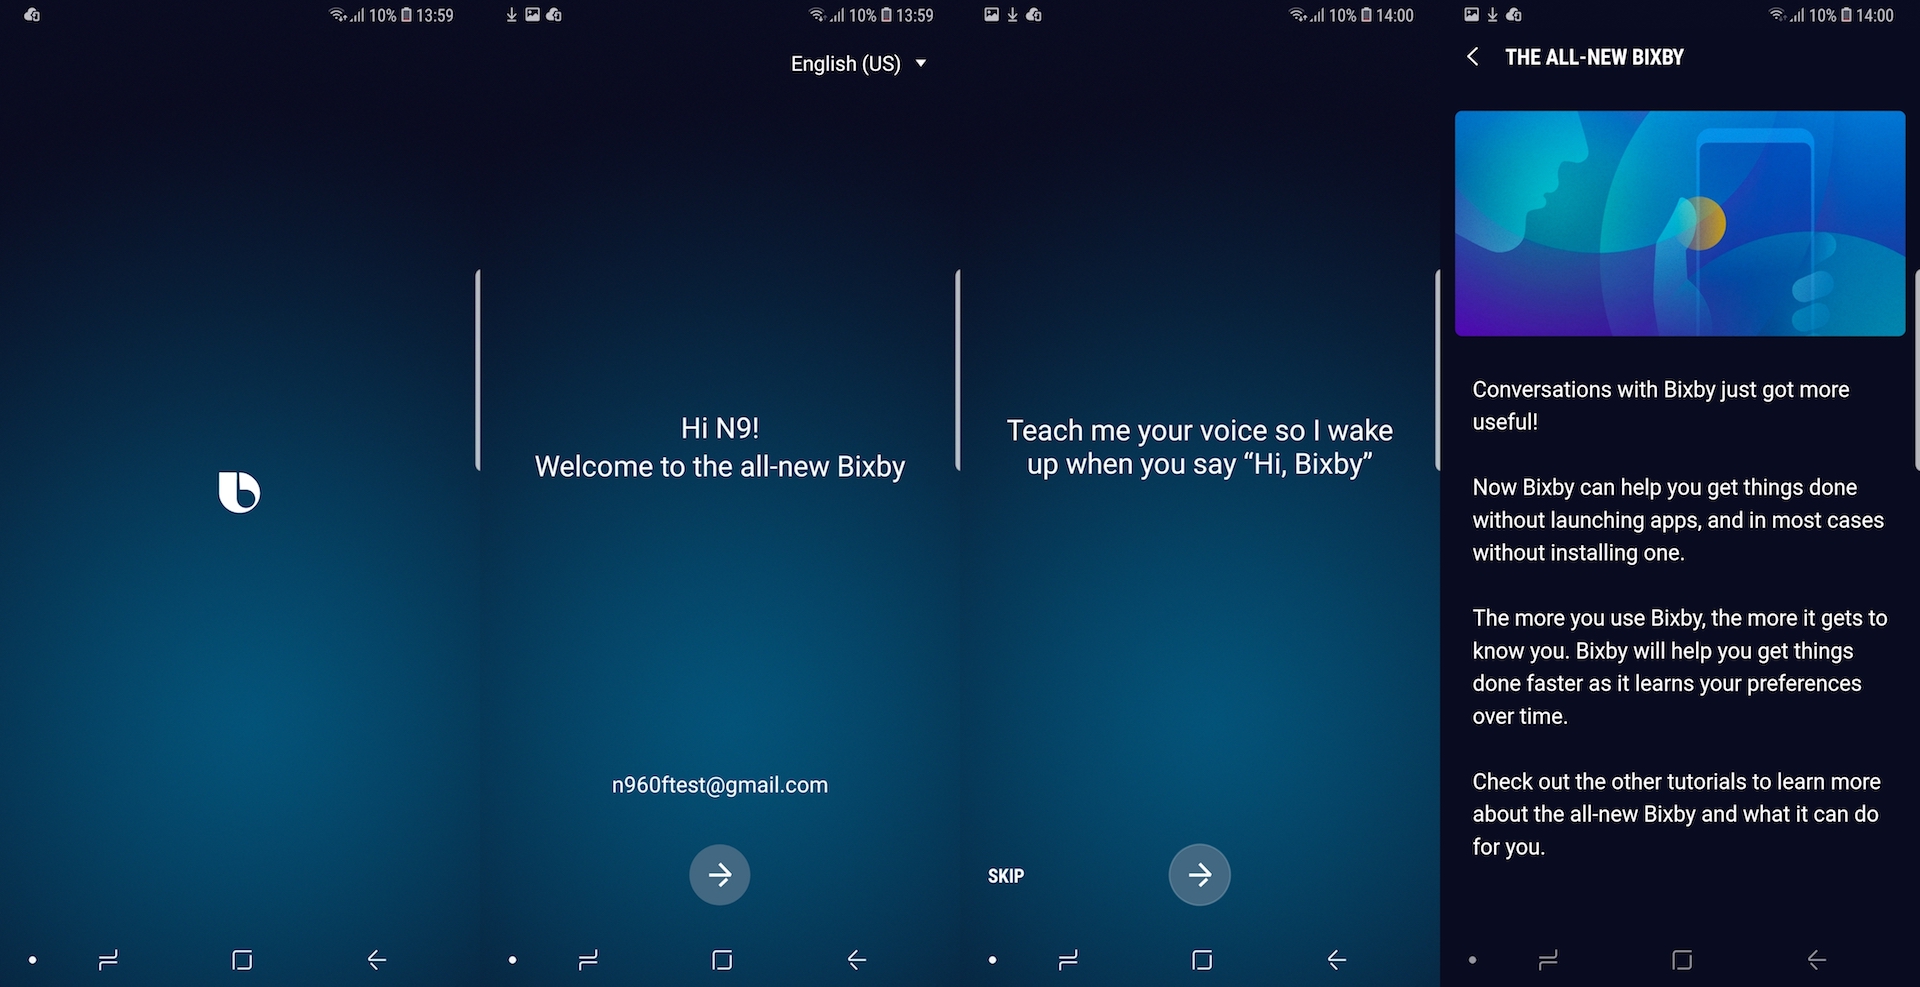
Bixby’s polarizing presence continues on the Galaxy Note 9 as well and there’s no escaping it because you can’t completely disable Bixby on the device. Might as well set it up and see if the new improvements made to the assistant make it any more useful. Bixby will update when you launch it for the first time by pressing and holding the dedicated key.
You will then be prompted to teach it your voice so that it can wake up when you say “Hi, Bixby.” You can access tutorials within the new Bixby interface to find out more about what it can do. The updated assistant has better natural language processing capabilities and get a lot more done for you without needing additional app installs.
8. Create an AR Emoji
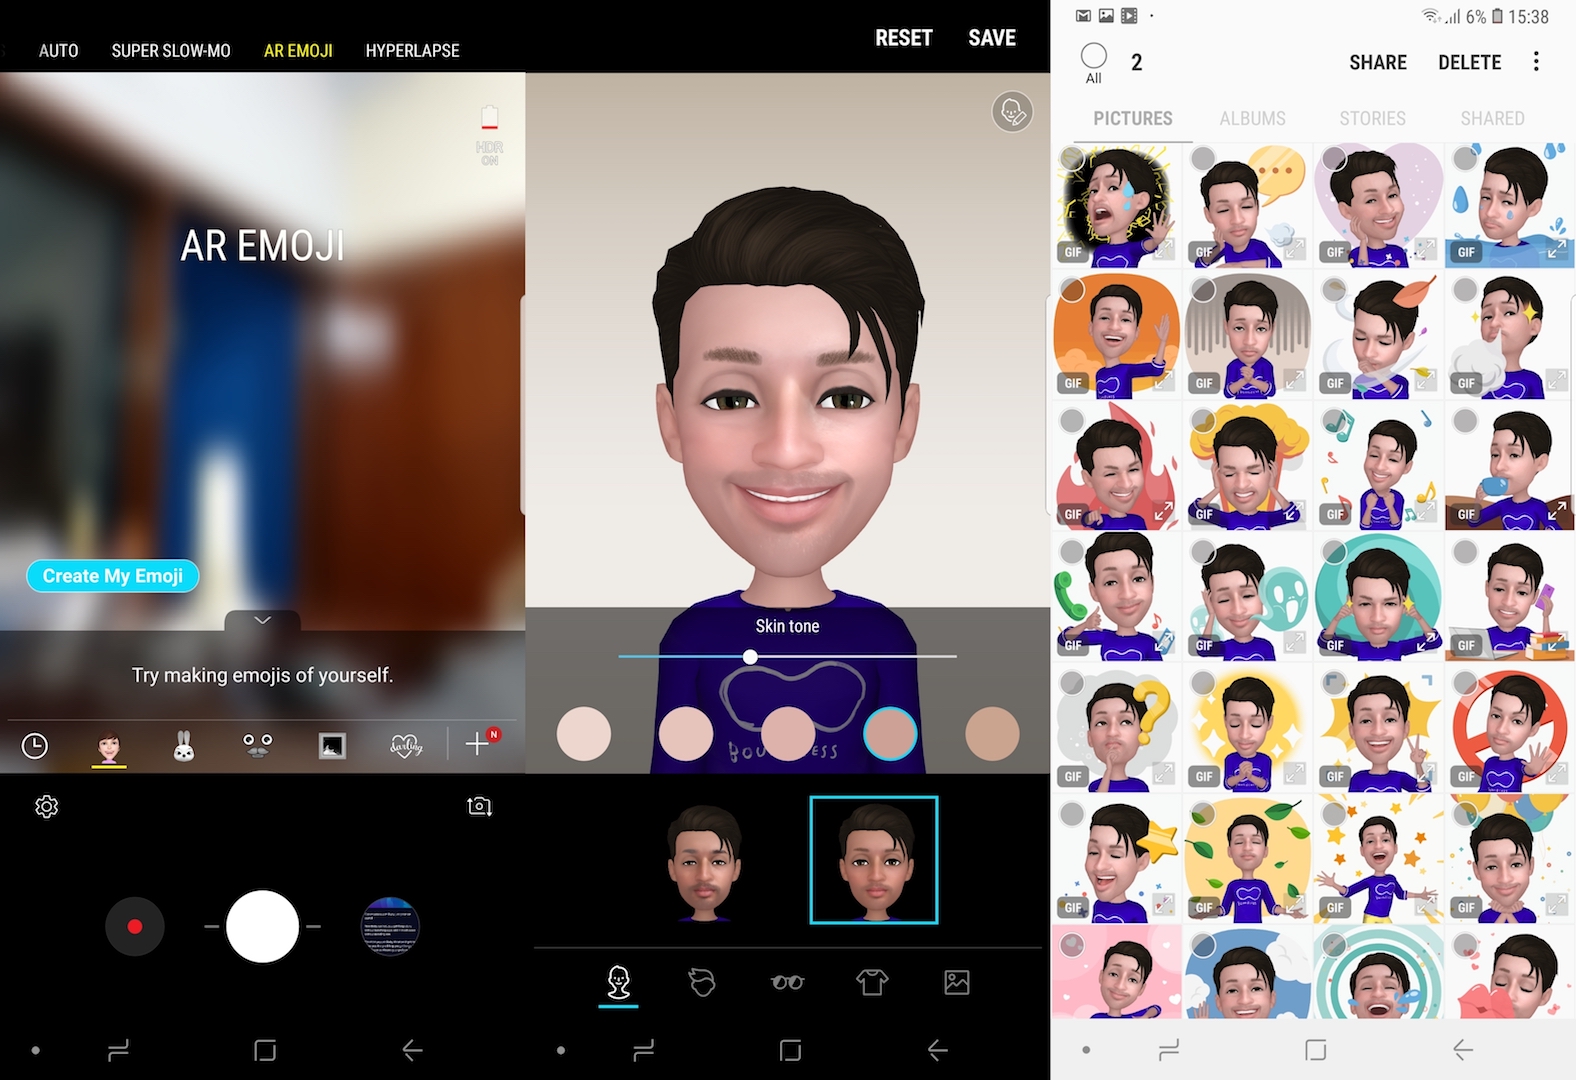
Samsung launched the AR Emoji feature with the Galaxy S9 earlier this year. It lets users create an animated digital likeness of their face which can then be used to record their facial expressions. Samsung also offers a variety of customization options for these digital avatars including hair, clothes, skin tone and more. Samsung also has a deal with Disney which has brought a variety of its popular characters to AR Emoji.
This feature wasn’t present on the Galaxy Note 8 so it’s one that you should take for a spin once you’re done with the Galaxy Note 9 setup. To create an AR Emoji, launch the camera app and select the AR Emoji mode. You’ll need to take a selfie of yourself before the feature can create your digital likeness. It will then present you with the customization options to finetune the appearance of your AR Emoji.
9. Configure Samsung Pay

Samsung’s mobile payments service is available in 24 markets across the globe. If you’re based in one of those markets, you should configure Samsung Pay to make payments on the go. With its MST technology, Samsung Pay lets you pay anywhere that you can already pay using a conventional credit and debit card.
The Galaxy Note 9 obviously has support for Samsung Pay and will allow for one-tap payments on the go. Samsung Pay can also be used for online payments in some markets. Refer to our comprehensive Samsung Pay guide to find out more about how you can set up and use the payments service on your new flagship.
That about does it for this Samsung Galaxy Note 9 setup guide. These are the new key things that you should set up on the flagship once you get it out of the box. Need any more information about any particular step? Let us know in the comments below.

The post 9 things to set up first on your new Galaxy Note 9 appeared first on SamMobile.
Read More.........